Zamp for NetSuite: Installation Guides
Overview
These guides will walk you through how to install the Zamp Sales Tax bundle in your NetSuite instance, depending on your existing set-up. It can directly be installed from either your Sandbox or Production account through the SuiteBundler. We recommend you install and test in your Sandbox before posting live transactions.
Read before starting installation:
The current set-up in your NetSuite will determine which installation path you take. Ensure you understand which set-up your currently have before installing the Zamp bundle.
Types of Set-ups
- Legacy (SuiteTax Disabled)
- SuiteTax Enabled
Installing the Bundle
- Navigate to Customization > SuiteBundler > Search & Install Bundles
- Search for Zamp Sales Tax
-
- Click the Install button
- Review the details of the bundle to ensure you are aware of what is being installed, and click Install Bundle when you are ready
- The bundle will begin installing, and it may take a moment to complete. You can periodically refresh the page until the status updates and shows a green checkmark, indicating the installation is finished

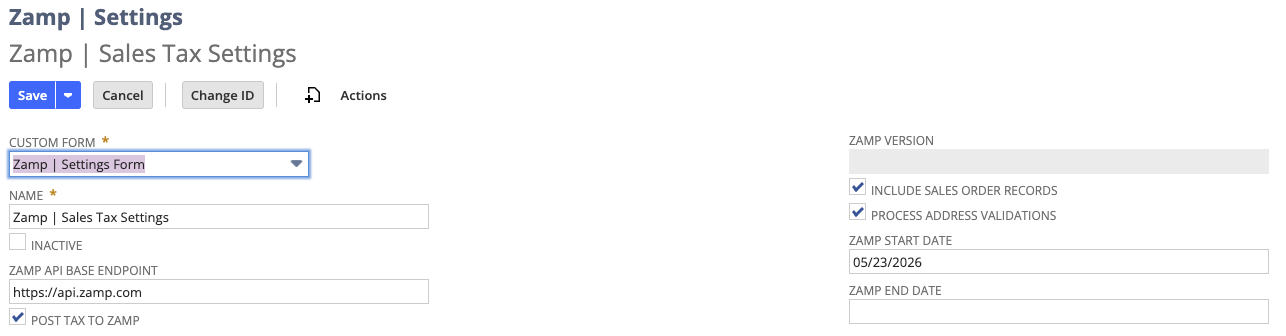
Zamp Settings for NetSuite
- Within your global search bar, search for New Zamp | Settings
- Once a new Zamp Settings Form has appeared, enter the following values:
- Name: Zamp | Sales Tax Settings
- Zamp API Base Endpoint: https://api.zamp.com
- Ensure all of the checkboxes are checked
-
- If you are concerned regarding any potential Zamp calculations overriding original tax amounts (very low risk of this), you can set a Zamp Start Date which will force Zamp to never override tax amounts before that date
- SuiteTax users should review the SuiteTax-specific section regarding this date setting
Setting up Your API Key(s)
Production
- Within your global search bar, look for Setup > Company > API Secrets
- Open the secrets record
- Enter the following values:
- Name: Zamp API Key
- ID: _zmp_api_secret
- Don't deviate from the above format
- Password: < Copy-paste your API Key >
- Confirm Password: < Copy-paste your API Key >
- (Optional) Description: You can choose to enter the first ~10 digits of your API key for future reference
- Hit Save
- Next, navigate to the Restrictions tab of the record and check the following boxes:
- Allow for all Scripts
- Allow for all Domains
Sandbox
The steps to set up a Sandbox key are exactly the same as above, but the entered values will need to indicate Sandbox:
- Name: Sandbox Zamp API Key
- ID: _sandbox_zmp_api_secret
- Don't deviate from the above format
- Password: < Copy-paste your Sandbox API Key >
- Confirm Password: < Copy-paste your Sandbox API Key >
Legacy (Non-SuiteTax) Set-up
If you have SuiteTax enabled (see directly below), skip to SuiteTax Set-up.
Setup > Company > Enable Features > Tax > SuiteTax (unchecked)

Setting up the Zamp Tax Vendor
This is a required step as this new vendor will be used to assign all Sales Tax liabilities generated from transactions using the Zamp Tax Code (from a later step)
- In the global search bar, naviate to Lists > Relationships > Vendors > New
- The following would be the values
- Company Name: Zamp Tax
- Category: Tax Agency
- Everything else is in accordance to your company
Setting up the Zamp Tax Type
- Select Setup > Accounting > Tax Types > New
- Enter Name of External Tax (Zamp)
- Do NOT deviate from this naming convention
- Select United States for the Country
- Fill in the Zamp Tax Type fields using the following details:
- Liability/Sales Tax Account can be blank
Setting up a Tax Liability Account (Not Always Required) - READ BELOW
To properly configure the required tax types and codes, you will need to ensure there is at least one Tax Liability Account that was set up as a Tax Control Account. If you already have an account in-use, you can skip this step!
Checking for a Tax Control Account
- In global search, look for Tax Control Accounts
- If no results appear, you'll need to create a new account
Setting up a new Zamp Tax Code
- In global search, look for Setup > Accounting > Tax Codes > New
- Select United States to start (International integration support for the future)
- Enter the following values
- Tax Name: Zamp Tax
- Do NOT deviate from this naming convention
- Display Name: Zamp Tax
- Rate: 0.00
- Tax Type: External Tax (Zamp)
- This should have been created above
- Include Children: Check this box
- Tax Agency: Zamp Tax
- Tax Account: < Select your liability account or the newly created account >
- Tax Name: Zamp Tax
- Hit Save
Importing Zamp Product Tax Codes
To ensure you have access to map all of Zamp Tax Codes, you will need to import codes via a script in the integration
- Look for Upsert Zamp Item Tax Codes in your global search bar
- You don't need to create a new script
- Click View
- Click Edit
- You can choose to schedule the script to run periodically, or just run it on demand. For set-up, you will need to run the script
- Under the Save option, Click Save and Execute
- Typical runtimes are under 5 minutes, but look for Running Process to confirm there are no errors
- To confirm the codes were pulled in as expected, search for Zamp Product Tax Codes
- A list of codes identical to the ones on this page should appear
Once completed, the Zamp integration is now fully set-up in your NetSuite instance! Take a look at our Customer Mapping and Product Mapping documentation to ensure your transactions will be calculated by Zamp, and posted for filing.
SuiteTax Set-up
Enabling SuiteTax alters how tax is configured within your account. It cannot be disabled, so Zamp has created an alternate set-up process to support SuiteTax enabled accounts.
Note:
SuiteTax is NOT required. If this is not enabled for your account, you do not have to enable it. See the Legacy (Non-SuiteTax) Set-up section above.

Setting up the Zamp Tax Vendor
This is a required step as this new vendor will be used to assign all Sales Tax liabilities generated from transactions under the relevant subsidiary
- In the global search bar, naviate to Lists > Relationships > Vendors > New
- The following would be the values
- Company Name: Zamp Tax
- Category: Tax Agency
- Everything else is in accordance to your company
Configuring the Zamp Tax Type
- In your Center Tab, look for Setup > Tax > Tax Types
- Hit Create New
- Enter Name of External Tax (Zamp)
- Select United States for the Country
- Fill in the Zamp Tax Type fields using the following details:
- Liability/Sales Tax Account can be blank
- Under the Accounts subtab, this will list any nexus that Zamp is configured to calculate tax on
- For each Nexus, you can map the account to your GL that will house all of your liability. Zamp makes it easy to see a breakdown state-by-state.
Note:
If a nexus is missing from the Zamp Tax Type, Zamp will not calculate tax via our tax engine.
Configuring your Subsidiaries for Zamp Nexus
- Navigate via Setup > Company > Subsidiaries > (Pick your subsidiary)
- Click the Tax Registrations subtab
- Tax Agency: The NetSuite agency record for the nexus
- Tax Reg. Number: As assigned by the taxing agency
- Tax Engine: SuiteTax Engine
- Tax-Exempt: Leave unchecked
- DO NOT check this box unless you are absolutely certain that subsidiary should never collect sales tax.
- Effective From: The date registration becomes effective
- Valid Until: Optional
Preventing Additional SuiteTax Override
- Navigate via Setup > Company > Subsidiaries > (Pick your subsidiary)
- Click the Tax Registrations subtab
- Click Edit
- For any configured nexus that does NOT have the Zamp Tax for the Tax Agency:
- Mark the Valid Until date to either the current day, or the next day
-

- If you run into an error setting a Valid Until date, due to transactions existing in the future, reach out to your Zamp representative for instructions on how to identify those future transactions.
- Repeat for the remainder of nexuses set up for any subsidiary Zamp will handle calculations for
- Then, navigate to Zamp > Tasks > API Connection > View (Zamp | Sales Tax Settings) and hit Edit
- For the nexuses you entered Valid Until dates under step 4 and 5, pick the earliest date as the Zamp Start Date. This will ensure that nexus conflict errors will not appear for any transactions before the nexus cutoff dates

SuiteTax Sales Tax Override
For Zamp to apply tax on your transactions, both the following conditions must be true. Conversely, if you do not want tax calculations to be through Zamp, not fulfilling both conditions will allow the alternate engine to own that process.
- The transaction's subsidiary has a Tax Registrations row for the applicable nexus.
- The External Tax (Zamp) Tax Type has the same applicable nexus in its Accounts subtab.
Example
A company has two subsidiaries, A (United States, US) and B (Singapore, SG).
- Subsidiary A's Tax Registrations include:
- Country: US
- Nexus: NY
- Tax Engine: SuiteTax Engine
- Subsidiary B's Tax Registrations include:
- Country: SG
- Nexus: SG
- Tax Engine: SuiteTax Engine
- Result: Zamp calculates tax on transactions for Subsidiary A, but not Subsidiary B.
Additional Recommendations
If you were previously using Avalara or another Tax Provider bundle, you may need to delete the other provider's bundle to prevent any unwanted overrides.